Web Hosting
A Brief Overview of Hosting Web Pages
What is a Web Server?
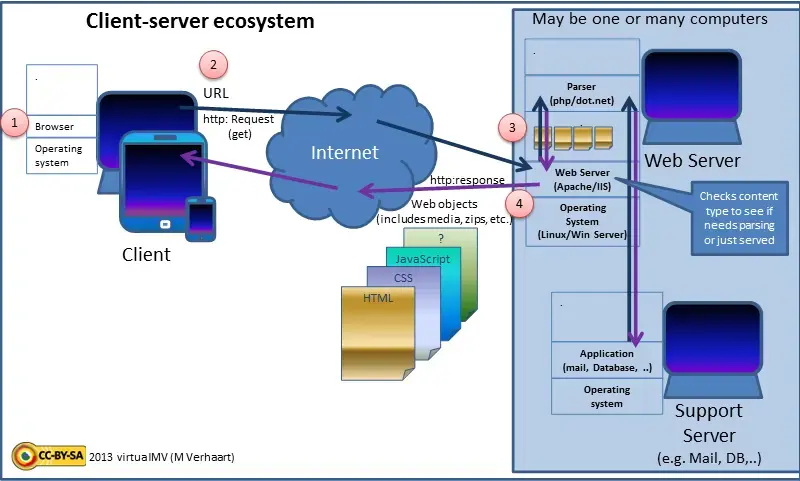
A web server is specialized software responsible for delivering web content to users over HTTP/HTTPS.
This can include static resources such as HTML/CSS/JS files—as well as images (JPG/PNG/WEBP) or archives (ZIP).
Static Sites
At its simplest level, a web server serves static resources to users—rendering a fully functional web page or a browsable file directory; static sites are static only, serving ONLY static resources.
However, administrative needs are often far more complex—requiring dynamic sites that are commonly powered by application frameworks or achieved with content management systems (CMS).
Dynamic Sites
Dynamic sites differ from static sites in that content is generated dynamically instead of serving precompiled resources.
When a user requests a page, the client sends a request in the form of HTTP request methods to the web server—given to an application framework or CMS (often querying a database/app).
Thereafter, the web server responds with a finalized HTML response in real time—hence the dynamic nature of the site.
Some common CMS platforms include: WordPress and Drupal; common application frameworks include: Node.js, Django, Ruby on Rails.What is a Reverse Proxy?
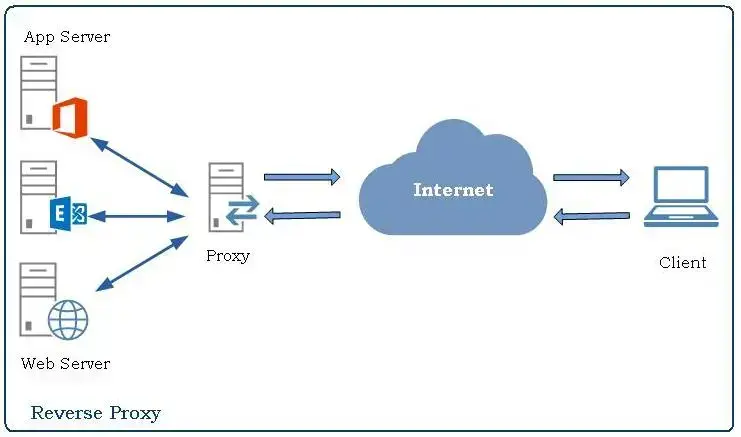
Often bundled with web server software, a reverse proxy is an intermediary server that sits between clients and one or more back-end servers (e.g., dynamic services), forwarding requests directly to the web or application servers.
Reverse proxies are especially useful when hosting dynamic sites that rely on application frameworks or CMS platforms.
These setups are often a combination of multiple components—such as databases, application servers, and caching layers (interlaced with CDNs).
As workloads are quite resource-intensive and more complex than traditional static sites, administrators also get the benefits of:
- Load Balancing: Distributing traffic across multiple servers.
- Caching: Frequently accessed content may be cached, reducing strain on back-end resources.
- Security: Obscures internal servers—hiding the identity of origin servers (if properly configured).
- TLS/SSL: Simplifies the management of TLS/SSL certificates, as they can be handled at the proxy level.
Configuring a Reverse Proxy
For this demonstration I will be deploying Nginx on a Debian (Trixie) VPS; this won’t differ significantly when compared to Ubuntu or RHEL derivatives.
There are various reverse proxies that may be utilized, but Nginx is far more reliable (not to mention, lighter under high concurrency) than Apache; Traefik and Caddy are also phenomenal options.
Important Prerequisites
I’d recommend finding a hosting provider that gives you full access to your machine/instance; for full digital sovereignty, avoid AWS/Cloudflare.
Ideally, it’s best to point an A/AAAA record to your instance (if you have purchased a domain).
Creating a New User
It is not advisable to use a root user for managing your host; create a new user instead.
1### Create a New User (Root) ###
2useradd -m -s /bin/bash user
3usermod -aG sudo user
4
5# ! Set a Password ! #
6passwd user
Generating an SSH Key
It is best to avoid RSA, as it is an outdated cryptographic standard compared to the much newer and robust ED25519 algorithm (yes, even with the -b arg).
RSA 4096 (integer factorization) is still mathematically stronger than ED25519, but RSA generally has lower security per bit than ED25519's ECC algorithm. 1### Generate a Secure ED25519 Key (Client) ###
2# ! USE 100 KDF ROUNDS ! #
3ssh-keygen -t ed25519 -a 100 -o -f ~/.ssh/sshkey
4
5# ! ENTER A STRONG PASSPHRASE ! #
6Generating public/private ed25519 key pair.
7Enter passphrase (empty for no passphrase):
8Enter same passphrase again:
9
10# ! Output Should Be Similar ! #
11Your identification has been saved in /home/user/.ssh/sshkey
12Your public key has been saved in /home/user/.ssh/sshkey.pub
13The key fingerprint is:
14SHA256:tCzBHeMoatZ5jR3pvKaGdRs83AHARTYEk3j5Ln8VccE user@9020MT
15The key's randomart image is:
16+--[ED25519 256]--+
17| o+OO ... |
18| ..=*.= . E |
19| ..+.*. o |
20| o o X.o. . |
21| + o ++S. . . |
22| o .o.B.. . |
23| o +o+ . |
24| . .oo . |
25| .. . |
26+----[SHA256]-----+
27
28### Deploy the Key (From Client) ###
29scp ~/.ssh/sshkey.pub root@host:/home/user/
30
31# ! Install the Key (On Host) ! #
32mkdir -p /home/user/.ssh
33install -m 600 /dev/null /home/user/.ssh/authorized_keys
34cat /home/user/sshkey.pub >> /home/user/.ssh/authorized_keys
35
36# ! Manage Permissions (On Host) ! #
37chmod 700 /home/user/.ssh
38chmod 600 /home/user/.ssh/authorized_keys
39chown -R user /home/user
40
41# ! Remove Key (Host) ! #
42rm /home/user/sshkey.pubFirewall Configuration
Before we configure SSH (on the host), we need to manage our firewall first.
UFW is commonly bundled with stock Debian/Ubuntu server images, and while it is still more than enough—iptables is far more granular.
 1### UFW (Root) ###
 2ufw allow http
 3ufw allow https
 4ufw allow 5555/tcp
 5ufw default deny incoming
 6ufw default allow outgoing
 7ufw status verbose
 8
 9ufw enable
10systemctl enable --now ufw
11
12# ! OR ! #
13
14### Iptables ###
15# ! Flush Rules ! #
16iptables -F
17
18# ! UFW Equivalent ! #
19iptables -P INPUT DROP
20iptables -P FORWARD DROP
21iptables -P OUTPUT ACCEPT
22
23# ! Allow Loopback ! #
24iptables -A INPUT -i lo -j ACCEPT
25
26# ! Allow Established ! #
27iptables -A INPUT -m conntrack --ctstate ESTABLISHED,RELATED -j ACCEPT
28
29# ! Allow SSH (Non-standard Port) ! #
30iptables -A INPUT -p tcp --dport 5555 -j ACCEPT
31
32# ! Allow HTTP ! #
33iptables -A INPUT -p tcp --dport 80 -j ACCEPT
34
35# ! Allow HTTPS ! #
36iptables -A INPUT -p tcp --dport 443 -j ACCEPT
37
38# ! Allow ICMP (Caution) ! #
39iptables -A INPUT -p icmp -j ACCEPT
40
41# ! Persistence ! #
42apt update; apt install -y netfilter-persistent iptables-persistent
43netfilter-persistent save
Basic SSH Security
Now that we’ve put everything else into place, it is time to secure SSH.
As you are hosting this publicly—it is best to have at least a secure baseline for SSH access.
This doesn’t have to be too complex, but a non-standard port and public key authentication should suit this just fine.
Take important notice of these configurations. 1### /etc/ssh/sshd_config (Root) ###
2# ! Set a Non-standard Port ! #
3Port 5555
4
5# ! Disable Root Login ! #
6PermitRootLogin no
7
8# ! Enable Public Key Authentication ! #
9PubkeyAuthentication yes
10
11# ! Disable Password Authentication ! #
12PasswordAuthentication no
13PermitEmptyPasswords no
14
15# ! Enable Strict Mode ! #
16StrictModes yes
17
18# ! Permit User ! #
19AllowUsers user
20
21# ! Fallback Prevention ! #
22ChallengeResponseAuthentication no
23
24# ! Disable Forwarding (We Are Not a Router) ! #
25AllowTcpForwarding no
26GatewayPorts no
27
28# ! Prevent Zombie Sessions ! #
29ClientAliveInterval 300
30ClientAliveCountMax 2
31
32# ! Prevent Session Abuse ! #
33MaxSessions 1
34
35# ! Brute Force Prevention ! #
36MaxAuthTries 3
37LoginGraceTime 30
38MaxStartups 3:10:30
39
40# ! Prevent Agent Abuse ! #
41AllowAgentForwarding no
42
43# ! Restrict Keys ! #
44HostKeyAlgorithms ssh-ed25519
45PubkeyAcceptedKeyTypes ssh-ed25519
46
47# ! Useful Additions ! #
48Compression no
49PermitUserEnvironment no
50
51# ! Test Changes (No Output is Good) ! #
52sshd -t
53
54# ! Restart the Service ! #
55systemctl restart --now ssh
56
57### SSH In ###
58ssh -i ~/.ssh/sshkey user@host -p 5555Deploying Nginx
After everything else has been completed, we can finally deploy Nginx!
For this demonstration, I will be installing both Nginx and Certbot to make the process as painless as possible (Let’s Encrypt); Certbot will automatically renew your TLS/SSL certificate (via Cron).
 1### Install Nginx and Certbot (Sudo Now) ###
 2sudo apt update && sudo apt install -y nginx python3-certbot-nginx
 3sudo systemctl enable --now nginx
 4
 5### Create a New Web Directory ###
 6sudo mkdir -p /var/www/webpage
 7
 8### Obtain a Certificate ###
 9certbot certonly -d tuckett-test.xyz
10
11# ! Output Should Be Similar ! #
12How would you like to authenticate with the ACME CA?
13- - - - - - - - - - - - - - - - - - - - - - - - - - - - - - - - - - - - - - - -
141: Nginx Web Server plugin (nginx)
152: Runs an HTTP server locally which serves the necessary validation files under
16the /.well-known/acme-challenge/ request path. Suitable if there is no HTTP
17server already running. HTTP challenge only (wildcards not supported).
18(standalone)
193: Saves the necessary validation files to a .well-known/acme-challenge/
20directory within the nominated webroot path. A separate HTTP server must be
21running and serving files from the webroot path. HTTP challenge only (wildcards
22not supported). (webroot)
23- - - - - - - - - - - - - - - - - - - - - - - - - - - - - - - - - - - - - - - -
24# ! We Are Using Nginx - Enter 1 ! #
25Select the appropriate number [1-3] then [enter] (press 'c' to cancel): 1
26Enter email address or hit Enter to skip.
27 (Enter 'c' to cancel): admin@tuckett.xyz
28
29- - - - - - - - - - - - - - - - - - - - - - - - - - - - - - - - - - - - - - - -
30Please read the Terms of Service at:
31https://letsencrypt.org/documents/LE-SA-v1.5-February-24-2025.pdf
32You must agree in order to register with the ACME server. Do you agree?
33- - - - - - - - - - - - - - - - - - - - - - - - - - - - - - - - - - - - - - - -
34# ! Agree to Terms ! #
35(Y)es/(N)o: y
36
37- - - - - - - - - - - - - - - - - - - - - - - - - - - - - - - - - - - - - - - -
38Would you be willing, once your first certificate is successfully issued, to
39share your email address with the Electronic Frontier Foundation, a founding
40partner of the Let's Encrypt project and the non-profit organization that
41develops Certbot? We'd like to send you email about our work encrypting the web,
42EFF news, campaigns, and ways to support digital freedom.
43- - - - - - - - - - - - - - - - - - - - - - - - - - - - - - - - - - - - - - - -
44# ! Optional ! #
45(Y)es/(N)o: n
46Account registered.
47Requesting a certificate for tuckett-test.xyz
48
49Successfully received certificate.
50Certificate is saved at: /etc/letsencrypt/live/tuckett-test.xyz/fullchain.pem
51Key is saved at:         /etc/letsencrypt/live/tuckett-test.xyz/privkey.pem
Configuring Nginx
Now we’ll need to configure Nginx so we may publish our web page.
 1### /etc/nginx/nginx.conf ###
 2#! Turn Off Server Tokens (Bare Minimum) ! #
 3server_tokens off;
 4
 5### /etc/nginx/sites-available/webpage ###
 6# ! Minimal Config ! #
 7
 8# ! HTTP - Redirects to HTTPS ! #
 9server {
10    listen 80;
11    listen [::]:80;
12    server_name tuckett-test.xyz;
13
14    return 301 https://tuckett-test.xyz$request_uri;
15}
16
17# ! HTTPS ! #
18server {
19    listen 443 ssl;
20    listen [::]:443 ssl;
21    server_name tuckett-test.xyz;
22
23    # ! Let's Encrypt Certificate ! #
24    ssl_certificate     /etc/letsencrypt/live/tuckett-test.xyz/fullchain.pem;
25    ssl_certificate_key /etc/letsencrypt/live/tuckett-test.xyz/privkey.pem;
26
27    # Recommended TLS params (installed by certbot)
28    include /etc/letsencrypt/options-ssl-nginx.conf;
29    ssl_dhparam /etc/letsencrypt/ssl-dhparams.pem;
30
31    # ! Web Root ! #
32    root /var/www/webpage;
33    index index.html;
34
35    location / {
36        try_files $uri $uri/ =404;
37    }
38}1### Enable Web Page ###
2# ! Test Configs ! #
3sudo nginx -t
4
5# ! Avoids Conflicts ! #
6sudo rm /etc/nginx/sites-enabled/default
7
8# ! Symbolic Link ! #
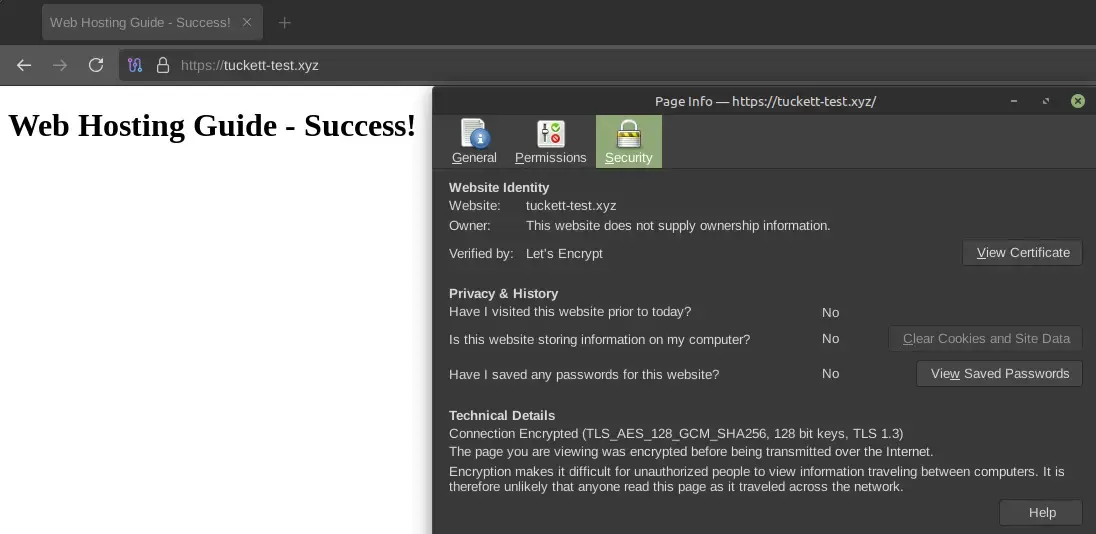
9sudo ln -s /etc/nginx/sites-available/webpage /etc/nginx/sites-enabled/webpageHTML Test
 1### /var/www/webpage/index.html ###
 2# ! HTML Test ! #
 3<!doctype html>
 4<html lang="en">
 5<head>
 6  <meta charset="utf-8">
 7  <title>Web Hosting Guide - Success!</title>
 8</head>
 9<body>
10  <h1>Web Hosting Guide - Success!</h1>
11</body>
12</html>
Applying Permissions
It is important that your web root and web content has the proper permissions.
- 755 (Folders): Owner (www-data) has rwx, group (www-data) has rx, others have rx.
- 644 (Files): Owner (www-data) has rw, group (www-data) only have r, others only have r.
 1### Apply Permissions (Script) ###
 2#!/bin/bash
 3
 4set -euo pipefail
 5
 6WEBROOT="/var/www/webpage"
 7USER="www-data"
 8GROUP="www-data"
 9
10sudo chown -R "$USER:$GROUP" "$WEBROOT"
11sudo find "$WEBROOT" -type d -exec chmod 755 {} \;
12sudo find "$WEBROOT" -type f -exec chmod 644 {} \;
13
14sudo systemctl restart --now nginx
Congratulations!
We finally have a working web page published—though we are far from finished.
This site is still highly vulnerable, and we’ll need to implement CSP and some configuration changes to Nginx itself; this needs to be production grade.
In no way should you actually leave it this vulnerable—even if your site is purely static, you should harden it as much as possible.